![]()
![]()
![]()
![]()
|
|
|
|
|
Definition of PMOD as a DICOM Server
PMOD can run a DICOM server process in the background which is able to receive data sent to it from modalities or a picture archiving system.
In general, a DICOM server is defined by three entities, the:
The last two entities for the operation of PMOD as a DICOM server are configured on the DICOM / DICOM SERVER pane.
Note: On Linux systems there exist reserved ports which require special permission to allocate. If such a port is defined as the PMOD DICOM server port, the server cannot be started from a user account and issues a message Permission denied. Starting as root will normally succeed, but this has the disadvantage that the saved files will all belong to the root. To prevent this situation a higher port number (typically >4000) should be used on Linux, rather than the default DICOM port 104. PMOD uses 4030 per default.
Besides the basic server information there are three checks relevant for the DICOM server operation:
Normally the DICOM server is receiving data over the network from DICOM clients. However, it is also possible to have the DICOM server scan a directory and treat found DICOM series in the same way as if they had arrived by the network. This functionality can be configured by the Check Incoming Folder box. If it is checked, the directory to be scanned can be entered as well as a scanning interval every ... seconds. This import feature can be used to convert from DICOM to any other output format, or to add DICOM images to a PMOD database. Note that after processing the images by the DICOM server they are removed from the incoming folder.
In the bottom section of the DICOM server configuration the following options are available:

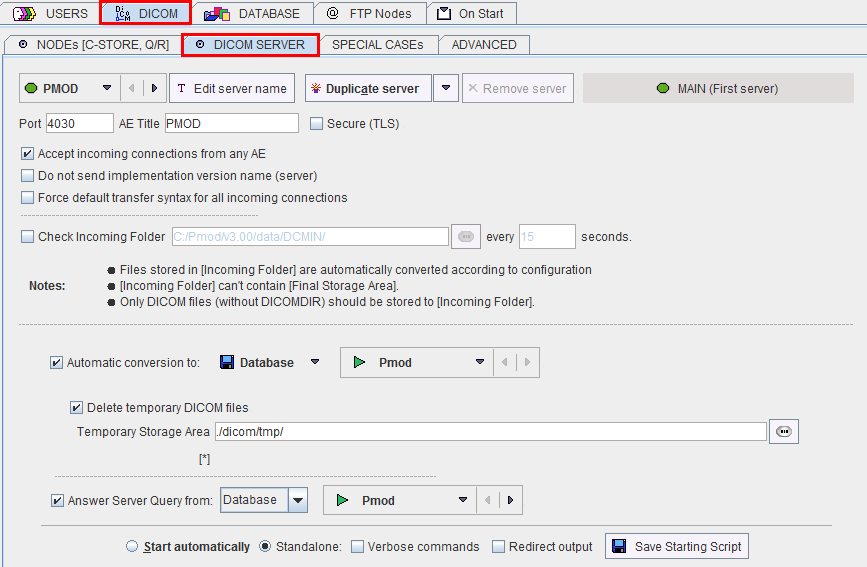
Saving the Images in a Database
The following configuration is recommended for all users who run a local database.
In this example the DICOM server, when run as user user 1, is receiving the images in the directory C:/Pmod3.3/data/dicom/tmp, saves them in the database Pmod, and then deletes the images in the temporary directory. When a remote DICOM client queries the PMOD DICOM server for studies, it will list all the studies in the Pmod database.
Support for Secure DICOM
Standard DICOM communication is not secure, and therefore is not recommended over public networks. To overcome this problem, a DICOM supplement has been finalized which allows implementing secure connections. PMOD supports one of the proposed variants called BASIC TLS SECURE TRANSPORT CONNECTION PROFILE. Of the three optional features (entity authentication, encryption, integrity check) encryption is implemented in the current release. As a consequence, the data transferred can only be interpreted by the target DICOM server with which the communication has been established.
The PMOD server may be configured to accept secure and insecure connections at the same time on two different ports. One port is designated for standard TCP/IP connection and the other for secure TLS connections. To enable secure DICOM, enable the Secure (TLS) checkbox, define a Port number, and the AET.
What happens with received DICOM Images
There are different possibilities what the PMOD DICOM server can do with the received images:
PMOD has the capability to configure different behaviors of the DICOM server. The configuration is not tied to the PMOD user who starts it. Therefore, the saving configuration is performed in the DICOM section of the PMOD configuration. So please select the DICOM tab and finally the DICOM SERVER sub-tab. Example configurations are shown below, but many other conversions are also possible.
Saving the Images as DICOM Part 10 Offline-Files
Alternatively, the received images can be saved in a DICOM Part 10 compliant manner. This behavior is configured as follows.
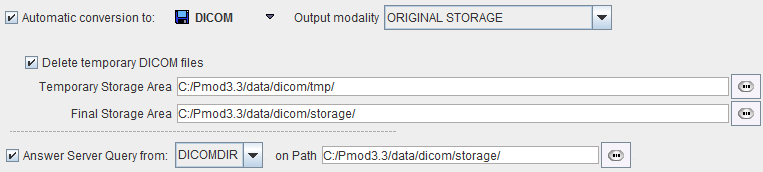
With this configuration, the images are stored in a directory hierarchy starting at Pmod3.3/data/dicom/storage. A DICOMDIR file will be maintained in the same root directory, and used to answer queries.
Note that you can use PMOD to create DICOM-compliant CDs. Just burn the DICOMDIR and the directory containing the DICOM files to a CD.
Filtering out Secondary Capture Images and Printing them
The configuration below illustrates the conversion capabilities.
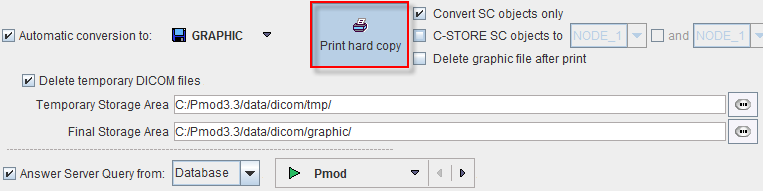
With this configuration, the images are converted to JPEG (GRAPHIC), a report page is prepared (Print hard copy) and sent to the system default printer, but only if the incoming object is of type Secondary Capture (Convert SC objects only). The original DICOM files are deleted, but the JPEG images are retained in the directory Pmod3.3/data/dicom/graphic . The additional checks allow routing the SC DICOM objects to a remote DICOM server, and deleting the JPEG files after printing.
Recommendations
Note that DICOM serves can be started and operated without consuming a PMOD license. This allows moving them to a server machine that is continuously operating and has fast disks. On this server machine perform a standard PMOD installation, plug the USB license protection key in, and use the Config facility for the database configuration and DICOM server script generation. Then start each of the DICOM server scripts in a separate command window. The USB key is now not any more necessary.