![]()
![]()
![]()
![]()
|
|
|
|
|
Overview
The P3D tool starts with an empty scene. The user can then create SR or VR objects by loading images and applying the available segmentation techniques. As soon as an object is created, it is displayed in the scene with default properties such as color and transparency. If the appearance of an object is not optimal, its properties can be changed and the scene refreshed until the user is satisfied.
Finally, the composition of the objects will show a meaningful scene which can be interactively explored to understand the spatial relationships of the segmented tissue structures. To this end the scene can be rotated in any direction, zoomed, and objects obstructing the view to deeper ones can be temporarily hidden or set to a high degree of transparency. Furthermore, planes showing the original image data can be added, or volumes-of-interest (VOI). To document meaningful results the current rendering can be saved as a screen capture, or a movie of a rotating scene can be generated. It is also possible to save the current configuration into a protocol file, so that it may be reconstructed from the original data at a later time.
Image Data Requirements
There are situations where objects are derived from a single data set, for example the boundary of a brain tumor and the outer brain contour. In this case the spatial alignment of the generated objects will be inherently correct.
However, if objects from different image series are rendered in a single scene, some requirements must be met to ensure that the objects are correctly positioned in the scene. The positioning rules in P3D are as follows:
So if the centers of two image volumes are aligned, objects derived from them can be combined, even if the pixel size is not the same.
Note: To ensure this requirement it is highly recommended to match the studies to be combined in the image fusion tool PFUS, save the fused studies, and use them for the 3D rendering.
When importing virtual reality (VRML) objects generated by other programs this behavior may not be adequate. In this case it can be changed in the P3D tool configuration.
Control Tabs
Along the right border there are two control tabs which group the different functions needed for data processing and image rendering. While they are stacked in practice, the graphics below shows them side by side to provide an overview of the user interface elements.
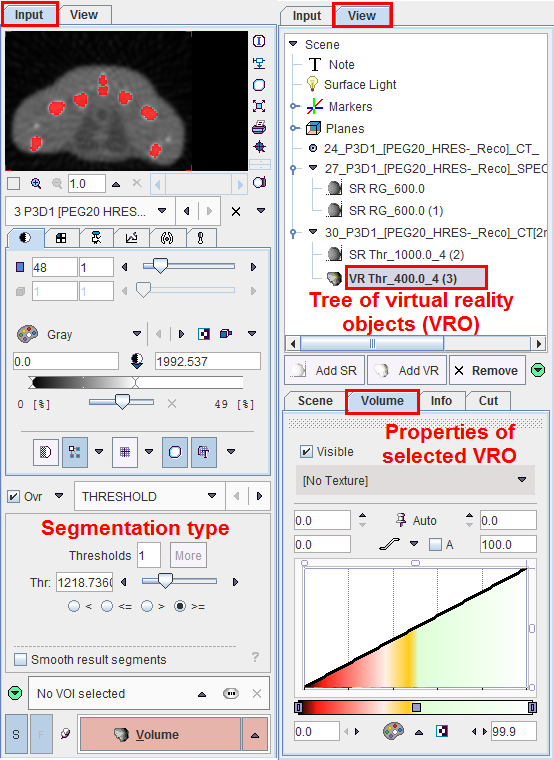
They implement the following functionality.
Input |
|
View |
|
The procedures to generate and manipulate 3D scenes are described in the next sections.